My buddy asked if I wanted to come along with him to our local shop that sells flies. I hadn't been in awhile so I decided to go. We walked over to the fly bin area and I started to scan around at the various patterns. While looking I ran across a small sign that said flies only $2.50. At first I figured they meant streamers were that price but I was mistaken. The streamers were $4-$5. I recently bought some flies last year via Etsy. The flies were $3.75 for 3. Recently I noticed those kind of deals are few and far between now. I'm wondering when I missed something. Did the price of materials go way up?
Seems like the average price for a fly is $2.29. This gives me way more incentive to tie and even possibly try to sell some of my flies. I'd happily take $2 for any fly I tie.
Has anyone else noticed this influx in pricing? Is it giving you more motivation to tie your own flies?
I spent a little time tonight tying bait patterns. These were tied with EP Fibers. I tried different profiles. A bluegill type profile and a thicker and thinner minnow type. I'm still learning how much material is needed for each pattern. A little goes along way.
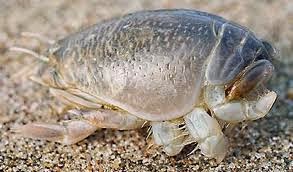
My family is taking a vacation in Florida this summer. I've been researching quite a bit about fishing there and there's one bait you see commonly referenced. Sand fleas, also called mole crabs or sand crabs. Apparently this is the preferred bait for most fish. In my research there doesn't seem to be a standard all around mole crab fly. This is what the actual crab looks like from the bottom.
(pic taken from http://www.flickriver.com/photos/shesnuckinfuts/885965272/)
The orange under the body is eggs. I'm guessing this is a trigger for the fish so I tried to add that in all of the versions I tied.
This is what the crab looks like from the top.
(pic taken from http://grauhall.com/catalog/product_info.php?products_id=734&osCsid=0c8974cd8cd41c6349558c473d14f832)
I wasn't sure how important getting a shell like back would be. I decided to try making it with bucktail and Clear Cure Goo Flex.
I'm happy with how it turned out but in my experience sometimes you spend unnecessary time trying to make a fly too life like.
My favorite part is the dubbing. It is made by Darkwater Dubbing and already has a nice blend of flash mixed in. I used it in all of the flies then I tied some orange rabbit strip for the egg sack.
It's probably going to take a little time to get the fly to sink until the materials are waterlogged. The dumbbell eyes will help. These are pretty fun patterns to tie and I can't wait to see how they work out.
My main reluctance with trying out Clear Cure Goo was the price. The kit is around $50 and I just couldn't justify spending that much for something I wasn't sure I'd like. I ran across a forum thread about people in the same boat I was. The thread pointed out that you could get a whole setup similar to the kit for around $25. The key is the UV curing light. I thought CCG required a special UV flash light but it turns out you can use just any old UV light that's similar. I found one on Amazon for $7 then bought both the flex and thick Goo for $11 each. I'm glad I watched this video first before attempting to use CCG. It saved me from wasting it.
There are a ton of videos online showing you different ways to manipulate the goo and tie a infinite number of patterns. I started covering the clousers I had with the goo to get a feel for how the stuff works. The CCG thick really does cure in about 5 seconds. I probably held the light way longer than I needed to just out of fear the fly wasn't cured. The fly had a tacky sticky feel to it after but that can be removed using Sally Hansen's Hard as Nails or rubbing alcohol. You do smell some fumes while the goo is curing. Not sure what kind of brain damage that is causing. Covering the clouser heads was pretty easy and I have to say they look pretty cool as well.
My main goal for getting the goo was to tie some surf candies. I saw a few videos and it looked easy enough. I found right away after doing my first one that it definitely is not as easy as it looks. Especially using the CCG flex. the flex has a different consistency than the thick.The thick comes out like thick maple syrup and the flex comes out like neosporin. You can manipulate the thick by rotating the vise and have the material shape itself. With the flex you have to do more work. I tried manipulating the material with a bodkin and the applicator but it took more time than I liked. Each fly took about 8-10 minutes. I like how the flies turned out but they look like deformed bait fish.
The thing I love about the flex is the feel it gives to the fly. It's a rubber life like feel. The fly is squishy but firm at the same time. I think it really will make fish believe what they have eaten is alive and hold on to the fly longer. The candies were tied using EP 3D fibers. That's going to be a whole different blog post. I can't say I'd recommend them with the goo yet or not. I can tell you the stuff is strange and gets all over the place. I tied the foxy clousers on the right with the same stuff. I love how they turned out but I didn't use the goo with them.
I'm tying all these flies for our family vacation. We're going to Florida and I'm hoping to have a arsenal built up for the surf and bays near where we're staying. I'll try to keep posting what I tie and my experiences with the different materials as I go.
A few years ago I was introduced to the best top water bass fly I've ever fished. When I first tried the fly I didn't understand what made it so great. It just seemed like some foam and bucktail. Then as I worked the fly I noticed it dipped under the surface with each strip and slowly rose back to the surface. The rising fly was accompanied by several air bubbles. Several bass mouthed the fly and I was amazed by how long they would hold onto it.
I can only imagine because of the gushy life like feel. The fly works well stripped fast, slow or sitting with no action at all on the water. The fly has a ton of versatility. If the dips and air bubbles don't entice a strike the rubber legs might be just enough to get the fish to commit. I've found when I fish for bass I use this fly every time with out exception.
The fly is fairly easy to tie. It can be tied in a few minutes once you get the hang of it. Kent Edmonds is the unofficial inventor of the fly and he has detailed instructions on his site. Once you see a bass crush one of these flies you'll always have one in your fly box. The great thing is there is no real wrong way to tie them. I usually experiment with several colors.
The fly on the bottom left is a frog I tried to make. I saw the pattern on another site and I loved the look of it. The fly didn't turn out exactly as I'd hoped but I still think it will work.
It was too cold to fish last weekend and too rainy this weekend. At least there's football on and plenty of tying supplies. I messed around today and worked on a bass pattern. When it comes to tying dubbing matters. I got some from Stu Thompson of Dark Water Dubbing last year. I really liked this purple black color but I wasn't sure quite how to use it.
I'm not sure how this pattern will work but I like the look of it. I also used dubbing for several soft hackle bodies. The dubbing at Singlebarbed.biz is superb. I really believe it's made a difference with my flies. They have more of a buggy look.
I haven't tried to do any poppers for quite some time. I never really know how to tie them exactly. This was my attempt at a Sneaky Pete style pattern. The body is a little awkward but I think it will fish fine.
Recently I was sent a package from Stu Thompson. He is the originator of Dark Water Dubbing. The dubbing is what was used for the Damcraw fly that I submitted in the Carp Fly Swap. I asked Stu if he could come up with a white that had hints of chartreuse. He sent me a sample and at first I wasn't sure I liked it. The flies tied using the dubbing have a strange look to them. I kept thinking if Yoda had hair this is probably what it would look like.
I've fished these a few times and they work. I've caught catfish, crappie and panfish so far. I think larger ones will work for stripers and bass. I hope to find out shortly.
Carp Aficianado recently had a post about fishing for carp using midges. I took a shot at tying the flies he described. I didn't have any red beads so I tied some using the beads I had.
The flies are basically black thread, gold wire and a bead tied on a size 12 hook. Really easy to tie. Looking forward to testing these out soon.
The buff I ordered came in recently. I should have a review of that up shortly.
I had been trying to find a decent helgrammite/caterpillar/terrestrial pattern. The back of the bug needed something to give it definition. I looked into scud back but too me it was too pricey. In Fishy Fullum's book he talks about using a Ziploc bag to make scud backs. You cut the bag into strips using a razor blade. I decided to give it a try. This is a good time to showcase Singlebarbed dubbing. This stuff is great and has amazing colors. Here are my first attempts.
This is was tied using the brown dubbing.
This Claret color is pretty cool. I took a shot of the underside so you can get a good look at the dubbing. Click on the pic to see a larger view.
This next one is Olive.
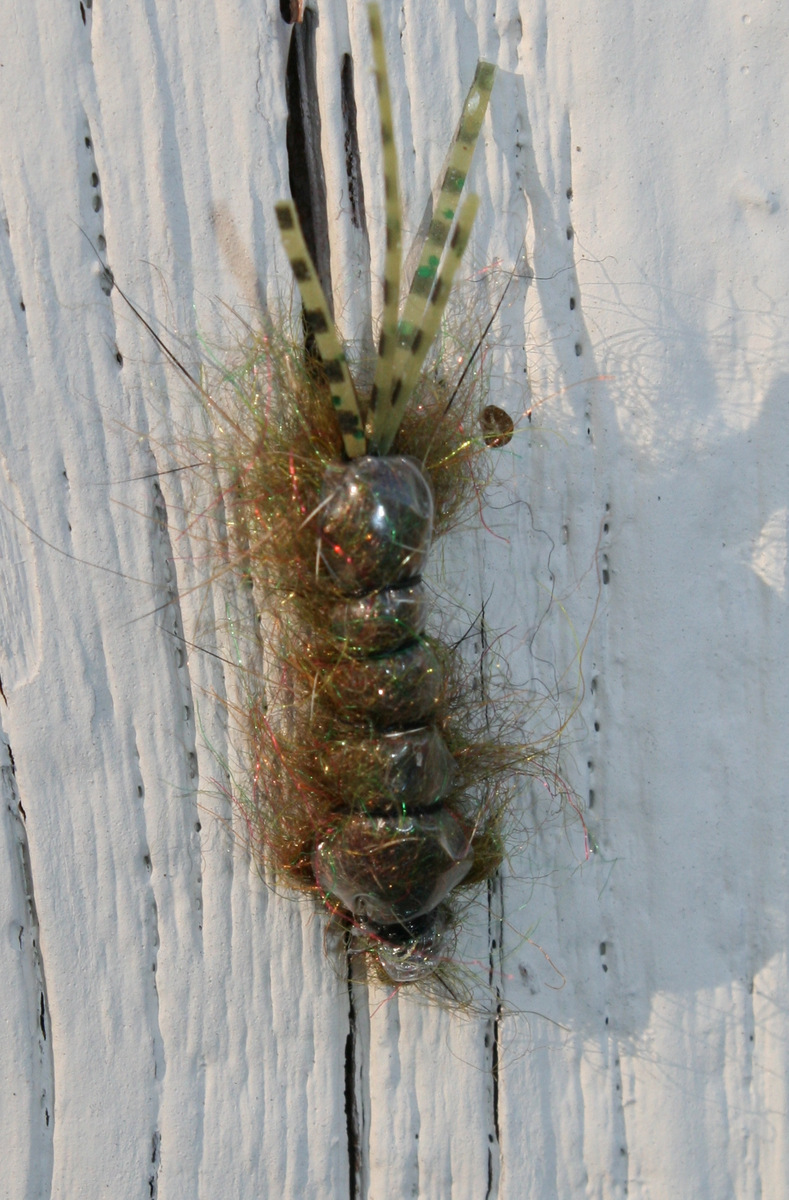
With some tweaking I think these flies will do the trick. I like the look of them. They really have a caterpillar look. Check them out on the fence.
KB at Singlebarbed has a real passion for making a great product. The dubbing is amazing and I highly recommend it.
A while back I fished with Thomas Harvey from Carolina Fly. Our target was white bass and we did really well with a red bead-headed white wooly bugger. I didn't really want to tie these but after finding none to buy online I realized I had to. I decided instead of a white hackle feather I'd use large pearl cactus chenille. I like how they turned out and I tied a few small ones for crappie.
Creating larger body flies can be a pain depending on how much dubbing you need. The time consuming and monotonous part was always twisting a dubbing loop. I knew there had to be an easier way. I started googling dubbing tools and I ran across this video. It showed how to use a dubbing twister tool. I bought one of these and I can tell you they work awesome.
There are basically two different styles of this tool. The cheap one shown above and a slightly more expensive twister tool shown below. I can see the one below being more efficient if you are tying a lot of flies. For me the simple tool works fine.
Inspired by Howard's post from Windknots and Tangled Lines I decided to post my recent ties. I found this fly at Orvis and I loved it. I'm a big fan of beads in flies and I also love soft hackles. This fly had a little of everything.
In the process of trying to tie this fly I went a little hackle crazy. I kept thinking about other things to add and try. Next thing I knew half of my tying materials were out on my table. I had so much crap stuff everywhere that I kept losing my scissors and other tools. Even if a fly turns out ugly I want to keep it. When you're tying a fly you kind of attach a memory too it. When you fish it you remember when you tied it and why you tied it that way. Here's what I ended up with and I know it's all over the board.
One thing you'll notice is how none of the flies look exactly the same. I have a hard time with that. I also don't stress about it so the flies come out how they come out.
I'll have to wait until the spring to try a lot of these. I have been working quite a bit on carp fly experiments. Most of them are similar or an attempt at what is out there.
These were my first attempts at Jay Zimmeraman's Back Stabbers. I really like how they came out and they are fairly simple to tie.
While looking into fly tying tips I ran across a website called Fly Anglers Online. The website had various tying information and a whole section on tips. There were quite a few I had never seen before. One was about separating bucktail.
Apparently if you take a razor and go straight down the dark section at the back of the tail it will separate the colors. This will give your buck tails a lot longer life. No more having to fight the hairs for a specific color as they thin out.
When I tie softhackles I always have an issue of trying to wrap while keeping the hackle fibers out of the way. The site showed an easy remedy for this. Just use a straw.
I can't believe I had never thought of this before. You can find straws in various sizes at most fast food places. With all the fancy pricey tying tools out there it's nice to have cheap and simple alternative.
Another one of my favorite tips deals with chenille. The material usually always comes on a piece of cardboard. It's easy to deal with but it can unravel fairly quickly. The answer is a pill bottle or 35mm film case.
Just drill a hole in it and pull out as much chenille as you need. This is a great way to keep the chenille tidy and you can even have it dangle and hang in the bottle, or hold on to the bottle while you're wrapping. I love reading tips like this and there is plenty more on the site. Definitely check it out. http://flyanglersonline.com/
Before the holidays I was researching gifts for the family. The Kindle Fire intrigued me because of all of its functionality. I bought the Kindle Fire HD right after Thanksgiving and I have been really pleased with it so far. It has been a great eReader for my wife and there are a ton of free games and apps. Many of them are educational and great for kids. One of the main reasons I looked into the Kindle Fire was the option of watching movies over the device. The Fire HD has a 16GB hard drive and can play various movie formats. During the recent Christmas break I was researching tying patterns on YouTube and I kind of wished there was a way to have the movie right there next to the vise. I do have a laptop and I could put that near me but it takes up quite a bit of room. This is where the Kindle Fire HD really came in handy. I found a way to download YouTube movies and copy them to the Kindle Fire. This is great because I can now watch the movies with out being connected to the internet. I figured others out there might find this useful as well. Even if you don't have a Kindle Fire you can still use this info to download movies to your computer. The steps are super easy and there is no special software needed. Everything you require is free on the web.
I'm providing these instructions for the sole purpose of helping with getting tying instructions. I do not condone pirating or stealing content that should be purchased from a vendor. Please make sure the content you are trying to download is not copyrighted.
The first task was finding a way to get a YouTube or Vimeo movie into a format the Kindle could read. MP4 was preferred. I found this website called KeepVid.com. Find a YouTube or Vimeo movie you'd like to download. For this example I'm using this video.
If you click on the video itself and go to the YouTube page the url for the video is at the top. It is also located under the video on the share tab. I have highlighted it in the graphic below.
Copy the URL then past it in the download field on Keepvid.com. Similar to the image below.
Click on the "Download" button. You will be presented with various download links and different formats.
The format I downloaded was the MP4 format. Save the file to your computer. It's that easy. After the file is downloaded you can now watch it at any time from your computer whenever you want.
To copy the movie to your Kindle Fire HD.
With the Kindle on, connect the Kindle Fire to your computer using a USB cable. Your Kindle should have come with this. On your PC, open up a explorer view so you can see your drives. An example in the graphic below.
If you're running Windows 7 you'll see the Kindle listed under your portable devices. Double click on the Kindle. You'll see the following screens after double clicking it.
Double Click Kindle Storage
The folders on your Kindle will be listed.
Open the Movies folder. Then open the location where you saved the video you downloaded.
The last step is to copy the movie from your local computer to the Kindle Movies folder. After it is copied, disconnect the Kindle from your computer. Navigate to the apps menu.
Choose the Personal Videos Icon, you can also download a free app like aVia.
I used the Personal Videos app for this tutorial. If you don't see it under the Cloud menu check the Device menu. Inside the app you'll see all of your videos.
Choose the video you want. I found this to be perfect for tying step by step next to the vise. The video is crisp and clear on the Kindle Fire HD. It's great to have the ability to pause or rewind the steps while you're tying.
If you want to look something up you can pause the movie and use the Kindle Fire's WiFi to surf the web. It really is a cool little tool.